
application.yml 설정 추가
spring:
    security:
        oauth2:
          client:
            registration:
              google:
                client-id:
                client-secret:
                scope:
                  - email
              naver:
                client-id:
                client-secret:
                scope:
                  - nickname
                  - email
                client-name: Naver
                authorization-grant-type: authorization_code
                redirect-uri: http://localhost:8080/login/oauth2/code/naver
            provider:
              naver:
                authorization-uri: https://nid.naver.com/oauth2.0/authorize
                token-uri: https://nid.naver.com/oauth2.0/token
                user-info-uri: https://openapi.naver.com/v1/nid/me
user-name-attribute: response1편에서 구글, 네이버 설정 후 얻은 client-id와 client-secret를 넣어줍니다.
gradle 설정 추가
implementation 'org.springframework.boot:spring-boot-starter-oauth2-client'
SecurityConfig 설정 추가
@Configuration
@EnableWebSecurity
@RequiredArgsConstructor
public class SecurityConfig {

    private final JwtProvider jwtProvider;
    private final CustomOAuth2UserService customOAuth2UserService;
    private final OAuth2SuccessHandler oAuth2SuccessHandler;

    @Bean
    public SecurityFilterChain securityFilterChain(HttpSecurity http) throws Exception {
        return http
                .csrf().disable()
                .headers().frameOptions().sameOrigin().and()
                .sessionManagement().sessionCreationPolicy(SessionCreationPolicy.STATELESS)
                .and()
                .authorizeHttpRequests()

                ....
                ..//설정
                ....

                .anyRequest().authenticated()
                .and()
                .exceptionHandling().authenticationEntryPoint(new CustomAuthenticationEntryPoint())
                .and()
                .oauth2Login()
                .successHandler(oAuth2SuccessHandler)
                    .userInfoEndpoint()
                    .userService(customOAuth2UserService)
                .and()

                .and()
                .exceptionHandling().accessDeniedHandler(new CustomAccessDeniedHandler())

                .and()
                .addFilterBefore(new JwtFilter(jwtProvider), UsernamePasswordAuthenticationFilter.class)
                .build();
    }
}
successHandler(oAuth2SuccessHandler) : Oauth2 로그인 성공시 Oauth2SuccessHandler를 호출한다. (인증이 성공한 후의 작업)
.userInfoEndpoint() : 인증 제공자로부터 사용자 정보를 가져오는 엔드포인트 설정
.userService(customOauth2UserService) : 사용자 정보를 가져오는 서비스를 설정
CustomOAuth2UserService 구현
@Service
@RequiredArgsConstructor
public class CustomOAuth2UserService extends DefaultOAuth2UserService {

    private final UserRepository userRepository;

    @Override
    public OAuth2User loadUser(OAuth2UserRequest userRequest) throws OAuth2AuthenticationException {
        OAuth2User oAuth2User = super.loadUser(userRequest);
        String registrationId = userRequest.getClientRegistration().getRegistrationId();

        String userNameAttributeName = userRequest.getClientRegistration().getProviderDetails()
                .getUserInfoEndpoint().getUserNameAttributeName();

        Map<String, Object> attributes = oAuth2User.getAttributes();
        UserProfile userProfile = OauthAttributes.extract(registrationId, attributes);
        User socialUser = saveOrUpdateUserProfile(userProfile);

        return new CustomOAuth2User(socialUser, attributes, userNameAttributeName);
    }

    private User saveOrUpdateUserProfile(UserProfile userProfile) {
        return userRepository.findByEmail(userProfile.getEmail())
                .orElseGet(() -> userRepository.save(userProfile.toEntity()));
    }
}
OAuth2User oAuth2User = super.loadUser(userRequest) : OAuth2인증된 사용자의 정보를 담고 있는 OAuth2User 객체를 가져온다.
String registrationId = userRequest.getClientRegistration().getRegistrationId() : 요청된 클라이언트의 등록 ID를 가져온다. 어떤 OAuth2(구글, 네이버)가 사용되었는지 식별하는데 사용된다.
String userNameAttributeName = userRequest.getClientRegistration().getProviderDetails()
.getUserInfoEndpoint().getUserNameAttributeName()
: OAuth2제공자가 사용자 정보를 제공할 때 사용하는 사용자 이름 속성을 가져온다. ex) 구글(sub)
Map<String, Object> attributes = oAuth2User.getAttributes() : OAuth2 서비스 유저의 정보들을 Map형태로 가져온다.
UserProfile userProfile = OauthAttributes.extract(registrationId, attributes) : registrationId에(구글, 네이버) 따라 유저 정보를 통해 공통된 UserProfile 객체를 만들어준다.
User socialUser = saveOrUpdateUserProfile(userProfile) : 사용자가 존재하면 유저정보를 업데이트하고 존재하지 않으면 DB에 해당 유저를 저장한다.
OAuth2SuccessHandler 구현
@Component
@RequiredArgsConstructor
public class OAuth2SuccessHandler implements AuthenticationSuccessHandler {

    private final JwtProvider jwtProvider;

    @Override
    public void onAuthenticationSuccess(HttpServletRequest request, HttpServletResponse response, Authentication authentication) throws IOException, ServletException {
        User socialUser = ((CustomOAuth2User) authentication.getPrincipal()).getSocialUser();
        String token = jwtProvider.createAccessToken(socialUser.getEmail(), socialUser.getUserType());

        response.setHeader(HttpHeaders.AUTHORIZATION, "Bearer " + token);
        response.setStatus(HttpStatus.OK.value());
    }
}인증이 성공하면 해당 OAuth2SuccessHandler가 실행되면서 헤더에 토큰을 담아 응답을 내려줍니다.
OAtuhAttributes 구현
public enum OauthAttributes {

    GOOGLE("google", attributes -> new UserProfile(
            (String) attributes.get("email"),
            "Social" + UUID.randomUUID() //구글 닉네임은 임시로 값 부여...ㅠ 추후 수정
    )),

    NAVER("naver", attributes -> {
        Map<String, Object> response = (Map<String, Object>) attributes.get("response");
        return new UserProfile(
                (String) response.get("email"),
                (String) response.get("nickname")
        );
    });

    private final String registrationId;
    private final Function<Map<String, Object>, UserProfile> userProfileFactory;

    OauthAttributes(String registrationId, Function<Map<String, Object>, UserProfile> userProfileFactory) {
        this.registrationId = registrationId;
        this.userProfileFactory = userProfileFactory;
    }

    public static UserProfile extract(String registrationId, Map<String, Object> attributes) {
        return Arrays.stream(values())
                .filter(provider -> registrationId.equals(provider.registrationId))
                .findFirst()
                .orElseThrow(IllegalArgumentException::new)
                .userProfileFactory.apply(attributes);
    }
}OAuth2 제공자에 따라 UserProfile 객체를 반환한다.
동작 확인
시큐리티에서 기본적으로 제공하는 URL을 통해 따로 컨트롤러를 만들지 않고
http://localhost:8080/oauth2/authorization/naver 로 요청을 보냅니다.

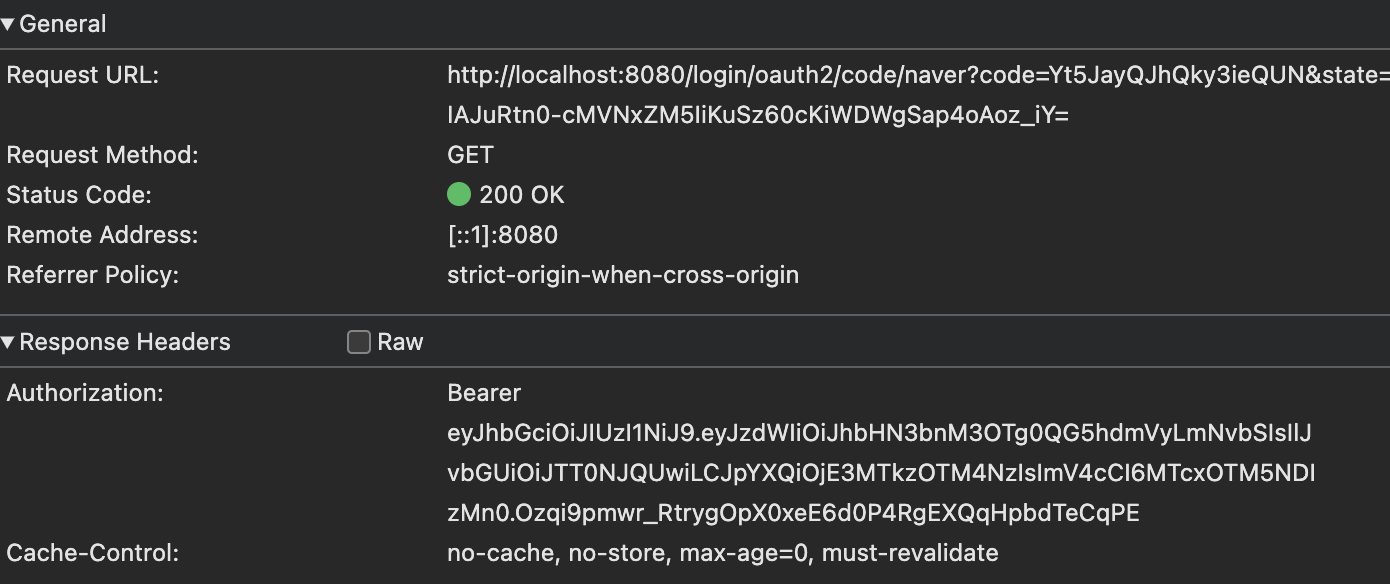
정상적으로 헤더에 토큰을 담아서 응답해주는 것을 볼 수 있습니다.
구글 로그인도 정상적으로 작동하는지 확인해봅시다.
http://localhost:8080/oauth2/authorization/google


구글 로그인도 정상적으로 토큰이 발급되는 것을 볼 수 있습니다.
총정리

1. 사용자가 로그인 버튼을 클릭하면 OAuth2 제공자의 인증페이지로 리다이렉트한다.
2. 로그인 페이지에서 인증을 수행한다.
3. 인증에 성공하면 애플리케이션으로 인증 코드를 반환한다.
4. 애플리케이션은 인증 코드를 통해 OAuth2 제공자로부터 액세스 토큰을 요청한다.
5. OAuth2 제공자는 애플리케이션에 access token을 반환한다.
6. 애플리케이션은 access token을 통해 OAuth2 제공자로부터 사용자 정보를 받아온다.
7. CustomOAuth2UserService를 통해 받아온 사용자 정보를 기반으로 유저를 create or update 한다.
8. 해당과정이 성공적으로 수행되면 토큰을 생성해 헤더에 담아 응답한다.
'Backend > 프로젝트' 카테고리의 다른 글
| QueryDsl을 활용한 카테고리별 조회(페이징) 기능 만들기 (1) | 2024.07.30 |
|---|---|
| Github Actions를 이용한 CI 구성 (1) | 2024.07.10 |
| OAuth란 무엇인가? (소셜 로그인 1편) (1) | 2024.06.17 |
| 모니터링 시스템 구축(1) Prometheus, Actuator 구성하기 (0) | 2024.06.13 |
| 모니터링 시스템 구축(2) Grafana 대시보드 구성하기 (0) | 2024.06.01 |
application.yml 설정 추가
spring:
    security:
        oauth2:
          client:
            registration:
              google:
                client-id:
                client-secret:
                scope:
                  - email
              naver:
                client-id:
                client-secret:
                scope:
                  - nickname
                  - email
                client-name: Naver
                authorization-grant-type: authorization_code
                redirect-uri: http://localhost:8080/login/oauth2/code/naver
            provider:
              naver:
                authorization-uri: https://nid.naver.com/oauth2.0/authorize
                token-uri: https://nid.naver.com/oauth2.0/token
                user-info-uri: https://openapi.naver.com/v1/nid/me
                user-name-attribute: response
1편에서 구글, 네이버 설정 후 얻은 client-id와 client-secret를 넣어줍니다.
gradle 설정 추가
implementation 'org.springframework.boot:spring-boot-starter-oauth2-client'
SecurityConfig 설정 추가
@Configuration
@EnableWebSecurity
@RequiredArgsConstructor
public class SecurityConfig {

    private final JwtProvider jwtProvider;
    private final CustomOAuth2UserService customOAuth2UserService;
    private final OAuth2SuccessHandler oAuth2SuccessHandler;

    @Bean
    public SecurityFilterChain securityFilterChain(HttpSecurity http) throws Exception {
        return http
                .csrf().disable()
                .headers().frameOptions().sameOrigin().and()
                .sessionManagement().sessionCreationPolicy(SessionCreationPolicy.STATELESS)
                .and()
                .authorizeHttpRequests()

                ....
                ..//설정
                ....

                .anyRequest().authenticated()
                .and()
                .exceptionHandling().authenticationEntryPoint(new CustomAuthenticationEntryPoint())
                .and()
                .oauth2Login()
                .successHandler(oAuth2SuccessHandler)
                    .userInfoEndpoint()
                    .userService(customOAuth2UserService)
                .and()

                .and()
                .exceptionHandling().accessDeniedHandler(new CustomAccessDeniedHandler())

                .and()
                .addFilterBefore(new JwtFilter(jwtProvider), UsernamePasswordAuthenticationFilter.class)
                .build();
    }
}
successHandler(oAuth2SuccessHandler) : Oauth2 로그인 성공시 Oauth2SuccessHandler를 호출한다. (인증이 성공한 후의 작업)
.userInfoEndpoint() : 인증 제공자로부터 사용자 정보를 가져오는 엔드포인트 설정
.userService(customOauth2UserService) : 사용자 정보를 가져오는 서비스를 설정
CustomOAuth2UserService 구현
@Service
@RequiredArgsConstructor
public class CustomOAuth2UserService extends DefaultOAuth2UserService {

    private final UserRepository userRepository;

    @Override
    public OAuth2User loadUser(OAuth2UserRequest userRequest) throws OAuth2AuthenticationException {
        OAuth2User oAuth2User = super.loadUser(userRequest);
        String registrationId = userRequest.getClientRegistration().getRegistrationId();

        String userNameAttributeName = userRequest.getClientRegistration().getProviderDetails()
                .getUserInfoEndpoint().getUserNameAttributeName();

        Map<String, Object> attributes = oAuth2User.getAttributes();
        UserProfile userProfile = OauthAttributes.extract(registrationId, attributes);
        User socialUser = saveOrUpdateUserProfile(userProfile);

        return new CustomOAuth2User(socialUser, attributes, userNameAttributeName);
    }

    private User saveOrUpdateUserProfile(UserProfile userProfile) {
        return userRepository.findByEmail(userProfile.getEmail())
                .orElseGet(() -> userRepository.save(userProfile.toEntity()));
    }
}
OAuth2User oAuth2User = super.loadUser(userRequest) : OAuth2인증된 사용자의 정보를 담고 있는 OAuth2User 객체를 가져온다.
String registrationId = userRequest.getClientRegistration().getRegistrationId() : 요청된 클라이언트의 등록 ID를 가져온다. 어떤 OAuth2(구글, 네이버)가 사용되었는지 식별하는데 사용된다.
String userNameAttributeName = userRequest.getClientRegistration().getProviderDetails()
.getUserInfoEndpoint().getUserNameAttributeName()
: OAuth2제공자가 사용자 정보를 제공할 때 사용하는 사용자 이름 속성을 가져온다. ex) 구글(sub)
Map<String, Object> attributes = oAuth2User.getAttributes() : OAuth2 서비스 유저의 정보들을 Map형태로 가져온다.
UserProfile userProfile = OauthAttributes.extract(registrationId, attributes) : registrationId에(구글, 네이버) 따라 유저 정보를 통해 공통된 UserProfile 객체를 만들어준다.
User socialUser = saveOrUpdateUserProfile(userProfile) : 사용자가 존재하면 유저정보를 업데이트하고 존재하지 않으면 DB에 해당 유저를 저장한다.
OAuth2SuccessHandler 구현
@Component
@RequiredArgsConstructor
public class OAuth2SuccessHandler implements AuthenticationSuccessHandler {

    private final JwtProvider jwtProvider;

    @Override
    public void onAuthenticationSuccess(HttpServletRequest request, HttpServletResponse response, Authentication authentication) throws IOException, ServletException {
        User socialUser = ((CustomOAuth2User) authentication.getPrincipal()).getSocialUser();
        String token = jwtProvider.createAccessToken(socialUser.getEmail(), socialUser.getUserType());

        response.setHeader(HttpHeaders.AUTHORIZATION, "Bearer " + token);
        response.setStatus(HttpStatus.OK.value());
    }
}
인증이 성공하면 해당 OAuth2SuccessHandler가 실행되면서 헤더에 토큰을 담아 응답을 내려줍니다.
OAtuhAttributes 구현
public enum OauthAttributes {

    GOOGLE("google", attributes -> new UserProfile(
            (String) attributes.get("email"),
            "Social" + UUID.randomUUID() //구글 닉네임은 임시로 값 부여...ㅠ 추후 수정
    )),

    NAVER("naver", attributes -> {
        Map<String, Object> response = (Map<String, Object>) attributes.get("response");
        return new UserProfile(
                (String) response.get("email"),
                (String) response.get("nickname")
        );
    });

    private final String registrationId;
    private final Function<Map<String, Object>, UserProfile> userProfileFactory;

    OauthAttributes(String registrationId, Function<Map<String, Object>, UserProfile> userProfileFactory) {
        this.registrationId = registrationId;
        this.userProfileFactory = userProfileFactory;
    }

    public static UserProfile extract(String registrationId, Map<String, Object> attributes) {
        return Arrays.stream(values())
                .filter(provider -> registrationId.equals(provider.registrationId))
                .findFirst()
                .orElseThrow(IllegalArgumentException::new)
                .userProfileFactory.apply(attributes);
    }
}
OAuth2 제공자에 따라 UserProfile 객체를 반환한다.
동작 확인
시큐리티에서 기본적으로 제공하는 URL을 통해 따로 컨트롤러를 만들지 않고
http://localhost:8080/oauth2/authorization/naver 로 요청을 보냅니다.
정상적으로 헤더에 토큰을 담아서 응답해주는 것을 볼 수 있습니다.
구글 로그인도 정상적으로 작동하는지 확인해봅시다.
http://localhost:8080/oauth2/authorization/google
구글 로그인도 정상적으로 토큰이 발급되는 것을 볼 수 있습니다.
총정리
1. 사용자가 로그인 버튼을 클릭하면 OAuth2 제공자의 인증페이지로 리다이렉트한다.
2. 로그인 페이지에서 인증을 수행한다.
3. 인증에 성공하면 애플리케이션으로 인증 코드를 반환한다.
4. 애플리케이션은 인증 코드를 통해 OAuth2 제공자로부터 액세스 토큰을 요청한다.
5. OAuth2 제공자는 애플리케이션에 access token을 반환한다.
6. 애플리케이션은 access token을 통해 OAuth2 제공자로부터 사용자 정보를 받아온다.
7. CustomOAuth2UserService를 통해 받아온 사용자 정보를 기반으로 유저를 create or update 한다.
8. 해당과정이 성공적으로 수행되면 토큰을 생성해 헤더에 담아 응답한다.
'Backend > 프로젝트' 카테고리의 다른 글
| QueryDsl을 활용한 카테고리별 조회(페이징) 기능 만들기 (1) | 2024.07.30 |
|---|---|
| Github Actions를 이용한 CI 구성 (1) | 2024.07.10 |
| OAuth란 무엇인가? (소셜 로그인 1편) (1) | 2024.06.17 |
| 모니터링 시스템 구축(1) Prometheus, Actuator 구성하기 (0) | 2024.06.13 |
| 모니터링 시스템 구축(2) Grafana 대시보드 구성하기 (0) | 2024.06.01 |